
Ever looked at your chain link fence and wondered if there's a way to make it feel less like a prison wall and more like a welcoming barrier? We've all been there. The good news is that adding privacy slats to your chain link fence isn't just possible—it's quite straightforward once you know what you're doing. Whether you're trying to block out neighbors' views, create a private backyard space, or simply want to improve your property's appearance, this guide will walk you through everything from basic concepts to installation techniques.
Chain link fences have been a staple in American yards for decades. They're affordable, durable, and provide excellent security. But let's be honest—most people find them a bit too... well, chain linky. The good news? You don't have to live with that harsh, open look forever. Privacy slats are the answer. These simple additions can completely transform how your fence looks and functions. Whether you're dealing with nosy neighbors or just want to create a more comfortable outdoor space, understanding how to install these slats properly makes all the difference. Think of this guide as your personal roadmap to fence transformation success.
Understanding Privacy Slats and Their Benefits
Privacy slats are thin panels that attach directly to your existing chain link fence. They come in various materials including vinyl, aluminum, and wood. The main benefit? They block sight lines while still allowing air and light to pass through. Imagine walking outside and no longer having to worry about being peered at through your fence. It's like having a secret garden instead of a public observation deck.
These slats aren't just about privacy though. They add visual appeal, reduce noise transmission, and can even increase your property value. Plus, they're relatively easy to install and maintain. Many homeowners report feeling much more comfortable in their outdoor spaces after adding these slats.
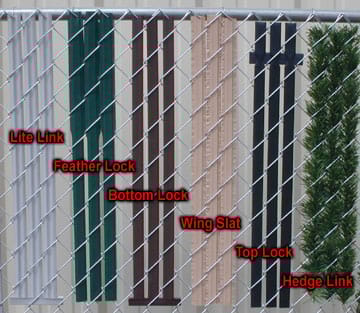
Types of Privacy Slats Available

The market offers several types of privacy slats, each with distinct characteristics:
Essential Tools and Materials Needed
Before diving into installation, gather these items:
Pro tip: Always double-check measurements before purchasing materials. A few extra inches of slats can save you from frustration later. Also, consider buying a little extra material for any unexpected cuts or repairs.
Measuring and Planning Your Installation
Proper measurement is crucial for successful installation. Start by measuring your fence length and height. Take note of any curves, corners, or obstacles that might affect placement. Most slats are between 24 and 36 inches wide, so plan accordingly.

Consider the direction of your fence's mesh pattern. The slats should align with the vertical bars rather than the horizontal ones for best results. If you're working with a curved fence, you might need to cut some slats to fit properly. Don't forget to account for the overlap at joints—this ensures a seamless look.
Sketch a simple layout showing where each slat will go. This helps visualize the final result and identify any potential issues before starting work.
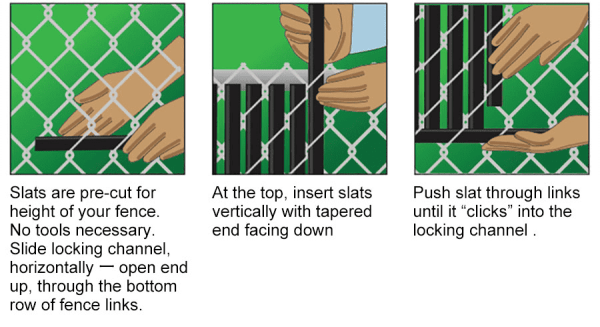
Step-by-Step Installation Process
Here's how to approach the actual installation:
1. Prepare the area - Clear the fence line of debris and ensure it's stable. 2. Mark attachment points - Use a level to mark where each slat will go. 3. Attach first slat - Start at one end and secure the first panel with screws. 4. Install remaining slats - Work systematically across the fence, ensuring alignment. 5. Check for gaps - Make sure there are no large spaces between slats.
Remember, patience pays off here. Rushing through the process often leads to misalignment or uneven installation. Take breaks if needed, and don't hesitate to ask for help when dealing with larger sections.
Troubleshooting Common Installation Issues
Even experienced DIYers encounter problems sometimes. Here are typical issues and solutions:
Don't get discouraged if things don't go perfectly the first time. Many small adjustments can fix major-looking problems.
Maintenance Tips for Long-Term Performance
Once installed, privacy slats require minimal care but do need regular attention:
For wooden slats specifically, re-staining every few years keeps them looking fresh. Vinyl and aluminum slats typically need just occasional washing to maintain their appearance.
Remember, proper maintenance extends the life of your investment significantly. A little care now prevents costly replacements later.
Cost Considerations and Value Added
Installation costs vary based on materials and labor. On average, DIY projects range from $2 to $5 per linear foot for materials alone. Professional installation might cost $8 to $15 per foot.
But here's the kicker—the value added to your property often exceeds the investment. Homebuyers appreciate privacy features, and they're willing to pay more for properties with attractive fencing. Additionally, privacy slats can reduce energy costs by blocking wind and reducing noise pollution.
Consider the long-term benefits: increased comfort, better sleep quality due to reduced noise, and enhanced property appeal. Sometimes the best investment isn't just about immediate returns but about improving daily life.
Safety Precautions and Best Practices
Related Posts

Unveiling the Timeless Charm of Black and White Striped Patio Um

Unpacking the Truth About Walking on Pool Covers Your Essential

Mastering the Art of the Perfect Pool Party Experience A Guest's Guide

Understanding the Pink Slime in Your Pool What It Is and How to Tackle It

Keeping Your Concrete Patio Happy and Safe Around the Fire Pit

Transforming Your Corner Lot A Masterclass in Curb Appeal
Safety should always come first during any installation project:
Also, avoid working in wet conditions when possible. Wet surfaces increase slip risks, and moisture can affect material adhesion. Plan your project around weather forecasts for optimal results.
Final Thoughts on Privacy Enhancement
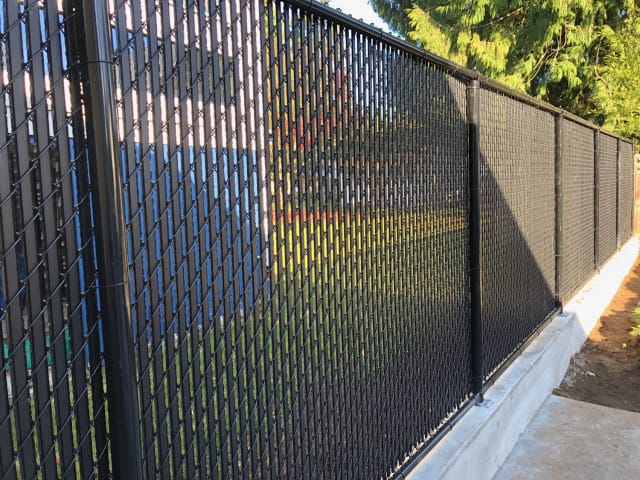
Adding privacy slats to your chain link fence transforms it from a utilitarian barrier into a functional part of your landscape design. The process isn't complicated, but it does require attention to detail and some patience. Whether you're looking to create a peaceful backyard retreat or simply want to feel more secure in your own space, this upgrade delivers real benefits.
Think of it as investing in your quality of life. Every evening when you step outside, you'll enjoy a sense of privacy that wasn't there before. The satisfaction of completing the project yourself adds another layer of pride. Plus, the positive impact on your home's curb appeal can't be understated. This simple change can make a big difference in how you experience your outdoor space—and how others perceive your property.
Installing privacy slats on chain link fences isn't just about hiding what's behind the fence—it's about creating a more enjoyable living environment. From choosing the right materials to executing a careful installation, every step contributes to a successful outcome. The investment of time and effort pays dividends in comfort, privacy, and property value. Whether you tackle the job yourself or hire professionals, the results speak for themselves. Your fence can become a beautiful, functional element of your outdoor space rather than an eyesore. With proper planning, the right tools, and a willingness to follow basic guidelines, anyone can achieve professional-looking results. The key is starting with confidence and ending with satisfaction. So grab those tools, measure twice, and build that privacy you've always wanted.
