
When it comes to bathroom fixtures, few names command as much respect as Kingston Brass. Their KVPB3722710 model stands out as a premium choice for those who appreciate both style and durability. Whether you're replacing an old fixture or installing something new, understanding how to properly handle this particular model can save you time, money, and frustration. This guide walks you through everything you need to know about installation and maintenance.
The Kingston Brass KVPB3722710 isn't just another bathroom fixture—it's a statement piece that brings elegance and functionality to any space. But like any quality product, it needs proper care and installation to perform at its best. If you've found yourself wondering how to tackle this specific model, you're in the right place. We'll break down every step from unpacking to daily upkeep, ensuring you feel confident no matter your experience level.
Understanding the Kingston Brass KVPB3722710
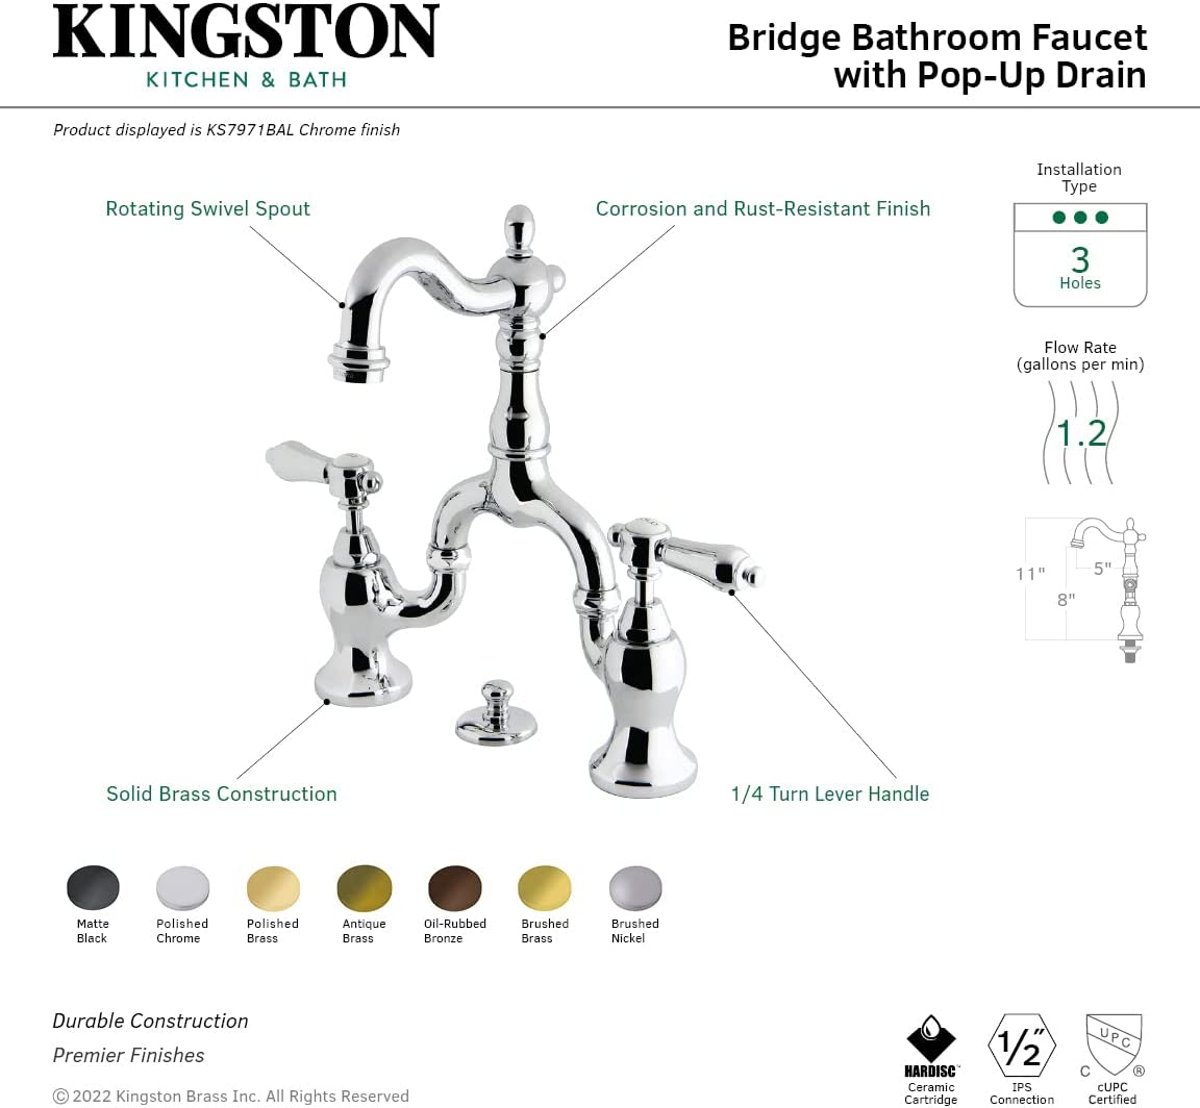
This fixture is part of Kingston Brass's commitment to combining classic design with modern innovation. The KVPB3722710 features a timeless aesthetic that complements both traditional and contemporary bathrooms. It's designed with durability in mind, using high-quality materials that resist corrosion and wear. What makes this model special is its versatility—it works well in various bathroom setups, whether you have a small powder room or a spacious master bath. The faucet body is typically made from solid brass, offering strength and longevity. The finish options vary, allowing you to match your existing décor seamlessly. Understanding these basics helps set realistic expectations for performance and care.
Preparation Before Installation
Before jumping into installation, preparation is crucial. Start by turning off the water supply to the area where you'll be working. You might need to shut off the main water line if there's no individual shutoff valve nearby. Next, gather all the necessary tools: wrenches, screwdrivers, pliers, and possibly a pipe wrench. Check that all parts included in the package match the listed components. Sometimes, items like mounting hardware or decorative caps get misplaced during shipping. Also, measure the space carefully to ensure the fixture will fit properly. If you're unsure about clearance or mounting requirements, consult the manufacturer's specifications. A little extra time here can prevent headaches later on. Don't rush this stage—it's the foundation of a successful installation.
Step-by-Step Installation Process
Begin by removing the old fixture if applicable. Loosen the nuts securing the existing setup and carefully lift it away. Clean the area thoroughly before proceeding. Position the new fixture in place, making sure it aligns correctly with the holes in your sink or countertop. Insert the mounting screws and tighten them gradually, ensuring even pressure across all sides. Connect the water lines carefully—this is where many people encounter issues. The hot and cold water connections should be clearly marked. If you're unsure which is which, look for labels or consult your local plumbing codes. Once connected, turn the water back on slowly and check for leaks. Tighten connections if necessary, but avoid over-tightening, which can cause damage.
Common Installation Mistakes to Avoid
Many people make the mistake of rushing through installation, leading to misaligned fixtures or loose connections. One frequent error is not checking the water pressure before installation. High pressure can cause leaks or damage to newer fixtures. Another common issue is improper sealing around the base of the fixture. Using too little or too much sealant can lead to water damage over time. Some installers forget to test the operation of the faucet before fully securing it. Always test the handle movement and water flow after connecting but before finalizing the installation. Also, don't overlook the importance of matching threads properly when connecting pipes. Mismatched threads often result in dripping or poor performance.
Daily Care and Maintenance Tips
Once installed, regular maintenance keeps your KVPB3722710 looking pristine and functioning smoothly. Wipe down surfaces daily with a soft cloth to remove fingerprints and water spots. For deeper cleaning, use mild soap and warm water. Avoid harsh chemicals or abrasive cleaners that could damage the finish. Pay attention to the aerator—the small screen at the tip of the spout. Over time, mineral deposits can clog it, reducing water flow. Remove and clean it monthly with vinegar to restore optimal performance. Check for leaks regularly, especially after heavy usage periods. Address any issues immediately to prevent further complications. Keeping a log of routine checks can help identify trends or potential problems early.
Troubleshooting Common Issues
Even with proper installation and care, some problems may arise. If you notice dripping from the spout, it could indicate worn-out washers or O-rings inside the faucet mechanism. These components usually need replacement every few years depending on usage. Handle stiffness might stem from debris buildup or lack of lubrication. Cleaning the internal parts and applying appropriate lubricants often resolves this. Water temperature inconsistencies can signal issues with mixing valves or thermostat settings. In such cases, consulting a professional plumber may be necessary. If the fixture starts making unusual noises, it could be due to loose parts or air trapped in the system. Running water through the faucet periodically can help release trapped air.
Installing and maintaining the Kingston Brass KVPB3722710 doesn't have to be daunting. With careful preparation, attention to detail, and consistent care, this fixture can serve you well for many years. Remember, each step matters—from checking your tools to performing regular maintenance. Taking the time upfront to understand the process pays dividends in long-term satisfaction. Whether you're tackling this project alone or seeking professional help, staying informed makes all the difference. Your bathroom deserves a fixture that not only looks great but also performs reliably. With this guide, you're now equipped to meet that challenge head-on.


Related Posts
 Home Decor
 Exploring the Design Elements of Cosa 48I01 86100 Square White Tile
 Home Decor
 The Role of Material Quality in Kingston Brass KVBH25227W8B Bathroom Fixture Longevity
 Home Decor
 The Ultimate Guide to Managing Kitchen Waste with Cyclonehaus Stuffer
 Home Decor
 The Art of Selecting the Right Bathroom Sink for Your Home
 Home Decor
 Comparing Kingston Brass VPB1368 Console Legs with Other Premium Cabinet Hardware
 Home Decor